Changes to the Aliner
Modifications to the Aliner
Problems I noticed right away:
1) Long items are difficult to move in and out of baggage doors (the edge of the door does not line up with the space) and are a nuisance to store on the floor.
2) There was no access under the center of the couch unless you moved all the cushions to the other end of the Aliner and then held up the plywood while you got out what you wanted.
2013 changes –
I removed part of the inside vertical wall behind the left baggage door and reinforced it. This allowed the Strongback chair to go in without so much struggle.
I added an access door under the couch so I could retrieve items from the aisle.
Late 2014, Early 2015 changes –
I removed the refrigerator and I made a wooden stand to replace it with a drawer in the top. The bottom part of the stand was large enough to hold a Thetford 550P porta potty inside. I also made an oak plywood door to conceal this area. The refrigerator can be reinserted easily. I removed the exterior vents for the fridge and put exterior plywood in their place held on by bolts and painted white.
I replaced the particle board dinette table top with an oak plywood one; this saved 5 pounds and I hate particle board (heavy, weak, susceptible to moisture damage).
I created an awning using the lift poles for the high wind kit on the left side and added square tubing temporarily on the right side to hold up the two top ends of a square tarp. For the bottom ends, I used variable length painter’s poles to hold it up and guy ropes to stake it out. It worked but it felt like too much trouble for a short stay and I did not use it much at all. I looked at stand-alone solutions but considered them heavy and bulky and they required valuable space on the camper floor or within the tow vehicle.
Late 2015 changes –
I replaced the wheeled tongue jack with an Ultimate Trailer Jack from Tractor Supply Co.
I added a Never Miss Hitch (I kept Hitchin rods as a backup).
I added a Northern Tool tongue box (this space is available because I don’t use propane tanks.)
I added a small box in a military day pack to hold 1 gallon of Coleman Fuel container (this goes in the tongue box).
Early 2016 changes –
On my 2015 trip, I found that awning poles and tent stakes were often awkward or impossible to use – sometimes the surface was impenetrable (asphalt, roots, rocks) and lines are easy to trip over at night. I designed an 7′ by 7′ awning that does not need stakes or tent lines. The top of the frame attaches to the Aliner and the lowest part of the frame rests on legs which attach to the side of the Aliner; it takes only minutes to put up. The awning and poles are rolled up and carried on the rear bumper. Being too long, however, they would stick out past the sides of the camper so I had to create a vertically diagonal holder made of plywood, bolts, and steel angle that was attached to a bike carrier. I used this on my 2016 trip. I thought I could add a Hide a Spare underneath but ran out of time and had to find a place for the trailer tire usurped by the bike carrier. The trailer tire ended up behind the passengers seat.
Late 2016 changes – Had top weather seal replaced. Had wheel bearings repacked.
Early 2017 changes –
I changed the awning so it would be tauter and shed water better. It also made it a little faster to erect. I now store it in the car instead of on the back bumper. I also replaced my air conditioner since mine died last year. Unfortunately, the air conditioner only lasted until Idaho. Next time I will get a portable air conditioner that can be easily swapped out.
I also replaced my trailer tires since they were 5 years old.
Late 2017 changes – Had wheel bearing repacked. Had top weather seal replaced.
2018 changes – none – short trip and I did not take my awning.
Early 2019 changes –
Found out that one of the wires to the battery was down to one strand of copper. Cut it off and replaced the battery connector on the end of the wire. Replaced the weather stripping around the door. Found out at the last minute that there was some corrosion on the bottom prong of the 7 prong trailer plug. I cleaned it off and later added dielectric grease.
Late 2019 changes –
After returning from Newfoundland, I had the wheel bearings repacked, brakes rebuilt, bungee cords replaced, front corner caps replaced, and top weather seal replaced.
2020 changes – replaced the tire carrier and tire that were stolen (approx. $200). Repainted and recaulked the plywood covering the vent holes for the fridge. Washed the Aliner (every 6 years whether it needs it or not.) Put the Aliner up for sale.
Changes to my Aliner related Gear
Hitching aids (useful for one person hitching)
I started out with “Hitchin rods” (magnetic based rods to line up by eye when you back up). They worked pretty well but I replaced them with Norms Never Miss Hitch. I get it in one try now.
Leveling
If it is level, I just use chocks. For 2013, 2014, and 2015, I used a Bal Leveler (it also acts as a chock for that wheel) along with Lynx blocks for really extreme slopes and a torpedo level to determine flatness. I used chocks on the non Lynx block side. I discovered after 15,000 miles, I don’t have to be quite that precise (within a half bubble on the torpedo level was sufficient) and after 2015, I started using just Lynx leveling blocks with a stop n chock which locks into the blocks. I had to bring some Lynx leveling blocks for extreme sites anyway and the Bal Leveler was somewhat bulky, heavy, and slow. It also stripped out on me once. I started out with Coleman plastic chocks but they shifted on me in a precarious location and I replaced them with heavy duty rubber chocks.
Security
When I am away from the Aliner, I use a hitch coupling lock and a Trimax wheel lock. I could not get the key out of the Trimax wheel lock before my 2019 trip and left it behind. It had been in the weather continually for years.
Storage
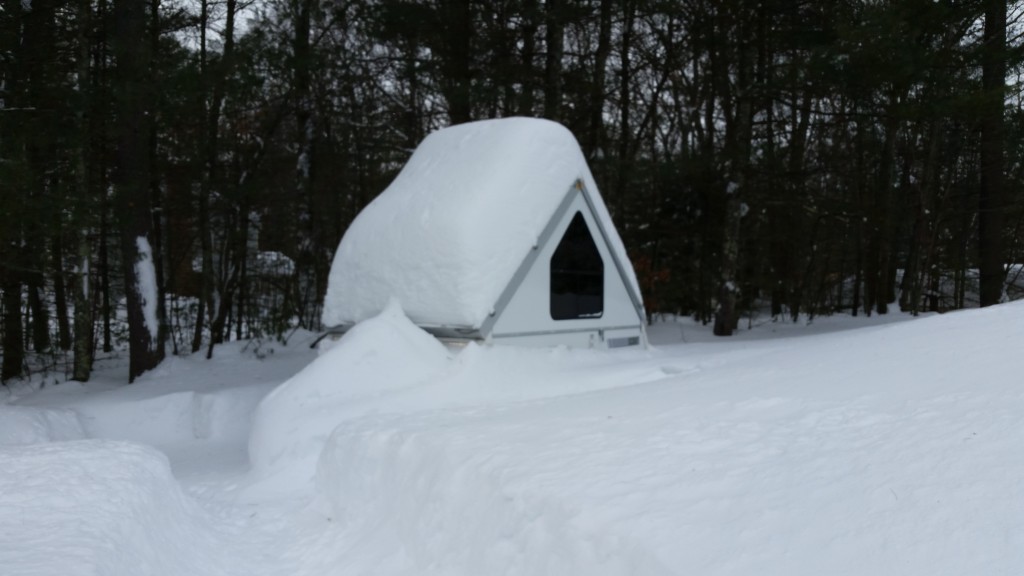
I store the Aliner in the up position during the winter. This was recommended by owners in the Aliners Club and has worked well since the winter of 2014 with no leaks. Most of the snow slides off but in a bad winter the snow can build up quite a bit.
Trailer hitch jack
I started out with a wheel in a tongue jack bowl, taking off the wheel and replacing it at every stop. After the Utah trip, I replaced it with an Ultimate trailer jack with a foot pad. No need for removing and replacing the wheel at each stop. While the camper is still attached to the car, the Ultimate Trailer jack slides up and down and can be fastened with a pin. After that, you can still crank it up or down as much as a regular trailer jack. This gives more leeway on steep slopes (I have hit a few). You can combine it with Lynx blocks to cover quite a height distance.
Towing Mirrors
I have Cipa clamp on mirrors. I had a longer version that worked with the Subaru but it wouldn’t fit on the Toyota Highlander. I find them useful.
Tire changing
I made sure I could change a flat tire before I ever got on the road. I found out that with the fancy aluminum wheels, I would need a torque wrench and a thin walled socket. In fact, my normal 4 way lug wrench could not fit in the recesses to take the lugs off. It turns out the lug nuts were slightly larger than needed (9/16?) and I replaced them with one half inch lug nuts to make sure I would be able to get them off when I needed them.
I also got a mountain bike tire pump (higher volume than a regular tire pump) and a short hydraulic jack (I put it on Lynx leveling blocks). I also built a connector to fit on the Aliner rail that has a place for the 1 inch cylinder of the jack to fit into. Less chance of slipping if the ground is not level.